SHORT VERSION…
QPublic parcel to ArcMap…
- Find parcel on QPublic site
- Search by Owner Name, parcel number, or road name
- After a successful parcel query, click the Map link at the top of the page to show QPublic’s map view.
- Download the parcel in KML format
- Hit the blue marble icon to initiate your KML download
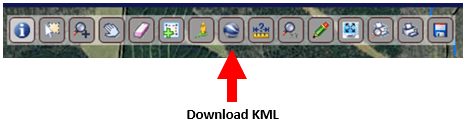
- Make sure you copy your downloaded file from the Downloads folder to your project folder on the E:\ drive
- Hit the blue marble icon to initiate your KML download
- Start blank ArcMap instance
- Set Data Frame Coordinate System (UTM/NAD83/Zone16N for western GA, UTM/NAD83/Zone17N for western GA)
- If you are unsure of your UTM zone, this site will help you out https://mangomap.com/robertyoung/maps/69585/what-utm-zone-am-i-in-#
- Import KML to ArcMap with the KML TO LAYER tool
- KMLs import as a feature class in a file geodatabase
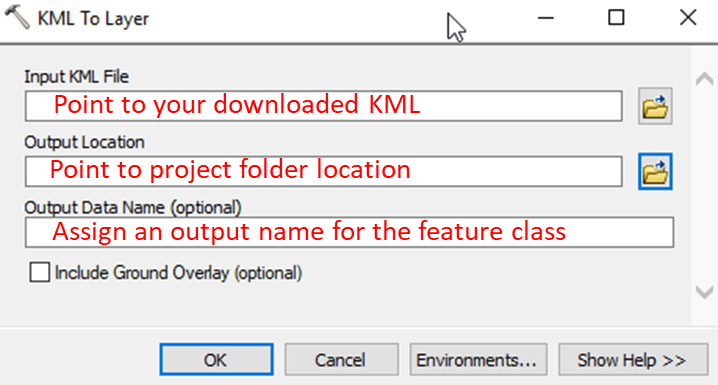
- FYI: After import, look at your project folder in File Explorer. You will see a file geodatabase that was created through this process (the folder with a .gdb extension)

- In the example above, my project folder is ./FORS7690/Fall2018/FORS7690/labs/QPublic/, and my file geodatabase is called ‘DallyvilleLLC’
- Set Data Frame Coordinate System (UTM/NAD83/Zone16N for western GA, UTM/NAD83/Zone17N for western GA)
Save parcel feature class out as a shapefile
- Still in ArcMap. Find the layer you just created using the KML TO LAYER tool. My TOC looks like this
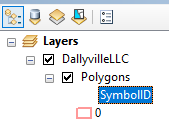 . My layer, it is a feature class, is called ‘Polygons’ and it is stored in the file geodatabase named ‘DallyvilleLLC’.
 - Right-click on your parcel layer feature class (probably named ‘Polygons’ in the TOCl) > Data > Export Data

- Since you explicitly set the data frame coordinate system, tick ‘the data frame’
- Use the file/open dialog to drill down to your project folder, set the file type to ‘shapefile’, name your file and append a ‘.shp’ extension
To review, you just:
- downloaded your QPublic parcel
- imported it into ArcMap as a FGDB
- saved the FGDB feature class as a shapefile
Follow those steps any time you want to import a KML into ArcMap. Easy enough, huh?