The following instructions step you through the process of connecting to the Warnell Global Mapper license server. If you are interested, you can install Global Mapper on your personal computer or lab machine, too. Download the installation files from the Global Mapper website (https://www.bluemarblegeo.com/products/global-mapper-download.php) and connect to the license server using the instructions listed below. If you are working off campus, you must first connect to the UGA network via the Cisco AnyConnect VPN. More information about the UGA VPN can be found here (https://eits.uga.edu/access_and_security/infosec/tools/vpn/).
(NOTE: I have been able to license both GlobalMapper v. 20.1 and 21.0 using these instructions)
- Start GlobalMapper v21
- START > Global Mapper > Global Mapper 21.0 (64bit)
- The GlobalMapper licensing dialog automatically appears
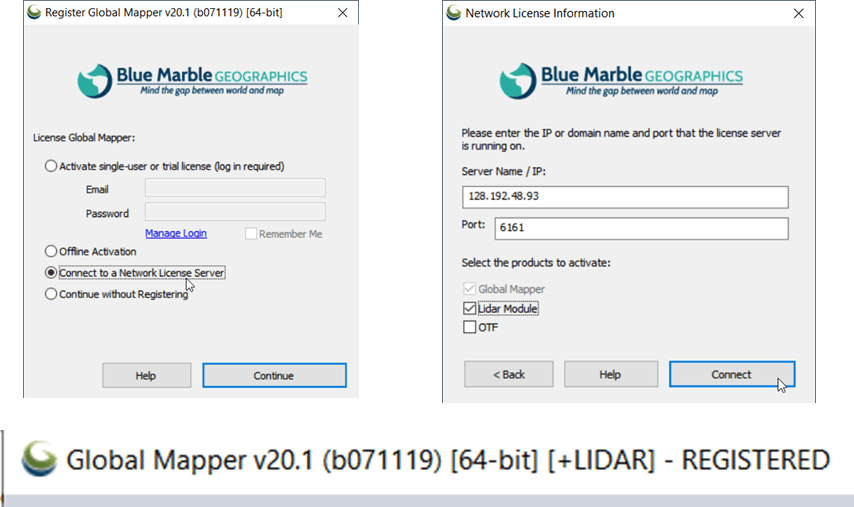
- Select “Connect to a Network License Server” Hit Continue
- Enter the Server Name/IP (128.192.48.93), the Port (6161), and tick the box next to “Lidar Module” Hit Continue
- Upon successful connection to the license server, a registered version of GlobalMapper starts and you are ready to begin processing your drone data
As with any new software, I encourage you to explore the GM online knowledge base (https://www.bluemarblegeo.com/products/global-mapper-arcgis.php), their online forum (https://www.globalmapperforum.com/), and Blue Marble Geo’s self-paced GM tutorials (https://www.bluemarblegeo.com/solutions/self-training.php). In this course, we will focus on the functionality provided by the LiDAR module (https://www.bluemarblegeo.com/products/global-mapper-lidar.php).