Georeferencing practice (Oconee Forest Park)
Set up your ArcMap project
- Load your georeferenced source image (NAIP2015_Source.jpg)
- Ensure your data frame coordinate system matches the NAIP (UTM17/NAD83/Zone17N…)
- Load your ungeoreferenced target image
- this layer is not georeferenced, you will not see it when it loads
- Save the project to your workspace
Locate possible ground control points (GCP)
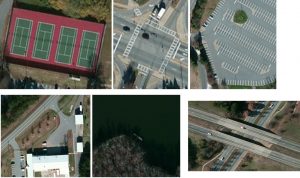
- GCP should be stationary object, low to the ground, easily observed on both the target and source images
- road intersections, edges of sidewalks, bases of monuments, etc
ArcMap procedures:
- Load the georeferencing toolbar (right-click on the grey banner at the top > select Georeferencing from the list)

- Specify your ungeoreferenced target image as the georeferencing layer
- Zoom to the area of interest on the source image, in this case the OCFP source image, and fit your target to display (Georeferencing pull-down > Fit to Display)
- Move your target image to the top of the TOC
- Insert GCP #1
* Zoom into the first GCP in the ungeoreferenced target image
* Grab the GCP tool (greenX/red button to the left of the drop-down)
* Click on GCP location in the target image
* Zoom to the same GCP location in the georeferenced source image
* With the GCP tool, click on the GCP location in the source image
* Repeat for at least 3 more GCPs
- After inserting four GCPs, evaluate your RMSE

- After inserting at least 6 GCP and with an RMSE of <= 0.55, apply the georeferencing solution
* Use the Update Georeferencing entry under the Georeferencing pull-down - Use the Define Projection (Data Management) tool to define the source raster’s coordinate system
* Define the CS to match the CS of the original source image.