Sumter County Cruise Data
Georgia GIS Clearinghouse Historical Imagery
- https://apps.itos.uga.edu/gsdi_rasterportal/
- State: https://apps.itos.uga.edu/gsdi_rasterportal/resources/WMTSCapabilities_Statewide.xml
- Regional: https://apps.itos.uga.edu/gsdi_rasterportal/resources/WMTSCapabilities_Regional.xml
- County: https://apps.itos.uga.edu/gsdi_rasterportal/resources/WMTSCapabilities_County.xml
Add a WMTS service to your ArcMap project:
- Open the Catalog window
- Scroll down and expand the GIS SERVERS selection
- Double-click ADD WMTS SERVER
- Paste the WMTS path into URL and hit GET LAYERS
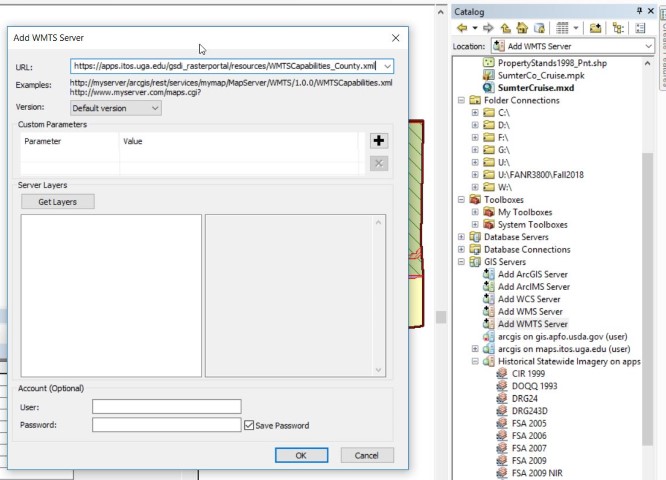
- Expand the “Historical Statewide Imagery on…” entry in the Catalog
- Drag an image set into the data view from the Catalog
Generate Cruise Grid
Three methods of generating a regular sampling grid:
- ArcToolbox Fishnet command
- ArcToolbox Convert To Grid command
- ArcGIS Add-In Cruise Grid v2
I present a fourth method of generating a sampling grid along a linear transect
- Points Along a Line
fishnet method
The Fishnet command in the ArcToolbox allows the user to create a regular grid of points across a landscape, large or small. The command is found in the ArcToolbox > Data mManagement > Feature Class > Create Fishnet
- Create Fishnet
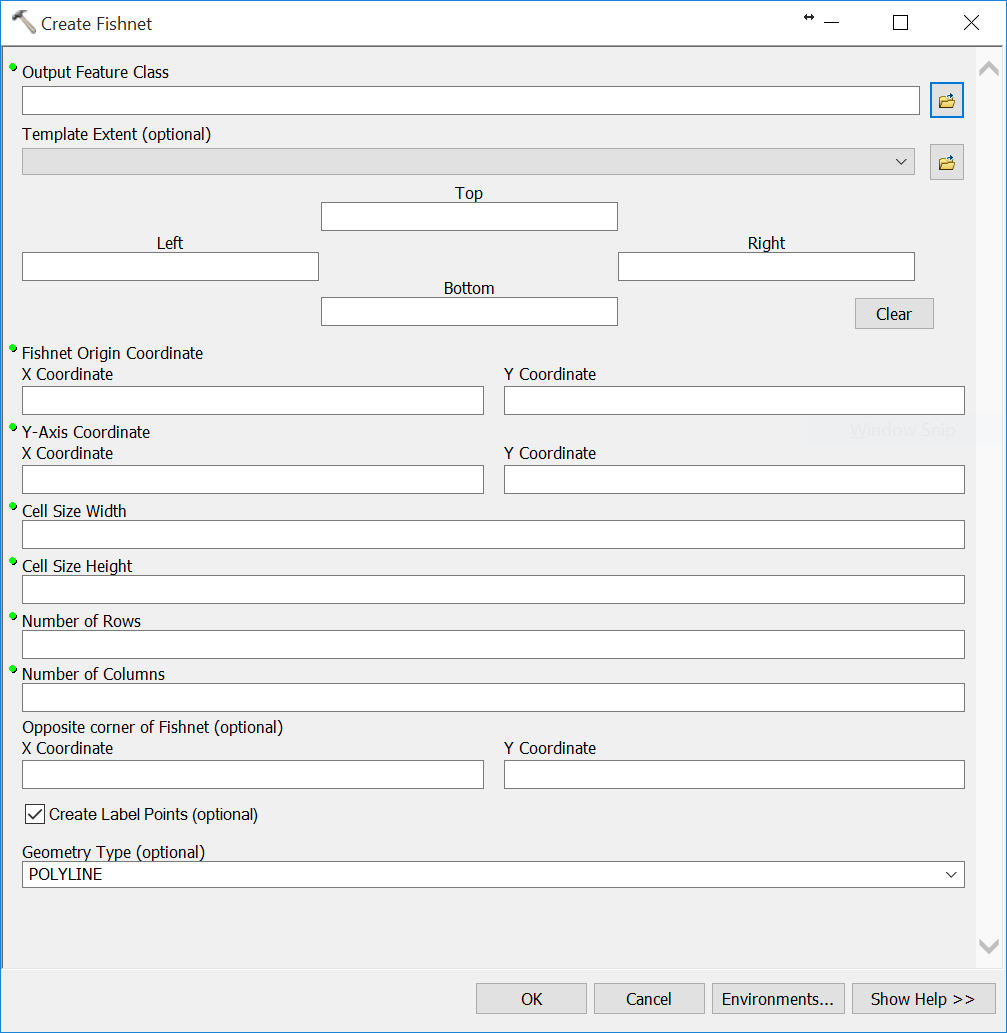
- Output Feature Class: v:\CruiseGrid4ch5ch.shp
- Use a file name that incorporates the cruise grid spacing
- Template Extent: Same as ….
- You either specify Cell Size Width/Height or Rows/Columns
- Specify CellSpecify Cell Size Width/Cell Size Height:
- Enter the spacing values in meters (or the unit of measure for your projection)
- Number of Rows/Number of Columns: 0
- Specify Number of Rows/Number of Columns
- Cell Size Width/Cell Size Height: 0
- Enter number of rows and columns
- Specify CellSpecify Cell Size Width/Cell Size Height:
- Tick box next to Create Label Points
- Use Select By Location (Selection > Select By Location) to select the points that fall inside your stand polygon
- Open the layer’s attribute table and make note of the number of selected records
– If you are required to generate the cruise grid on an X chains by Y chains (or feet, or meters, or any other distance unit of measure) basis, then proceed to step 3.
– If you are asked to generate X number of cruise points and you have the correct number of points selected in step 2, then proceed to step 3
– If you are asked to generate X number of cruise points and you do NOT have the correct number of points selected in step 2, then
- Return to step 1 and adjust the Cell Width and Cell Height values accordingly
- Give the Output Feature Class a slightly different name
- Repeat steps 1 and 2 until the number of selected points in step 2 match the number of points you require and then proceed to step 3.
- Export the selected points to a new shapefile
- Right-click on the layer in the Table of Contents > Data > Export Data
- Use the same file name as the fishnet but append a “_sel” to the end of the name (will be something like cruise4ch3ch_sel.shp)
This is a trial-and-error approach to generating a regular grid containing a predetermined number of cruise points. You will end up with quite a few point layers in the TOC if you have to repeat many times. It may help if you turn the unneeded layers off once you determine it contains an insufficient number of points. It will also help if you drag these layers down to the bottom of the TOC.
Convert to raster method (Polygon To Raster/Raster To Point)
This approach is an iterative method as well. Using this method, you convert one or a group of polygons to a raster with a set cell size (this determines the point spacing later on), and then convert the raster back to a point feature. This yields a square mesh of points.
- Select the stand or group of stands
- Convert your selected polygons to a raster
- ArcToolbox > Conversion Tools > To Raster > Polygon To Raster (this creates a new raster layer)
- Input Features: use the dropdown window to select the polygon layer with selected feature
es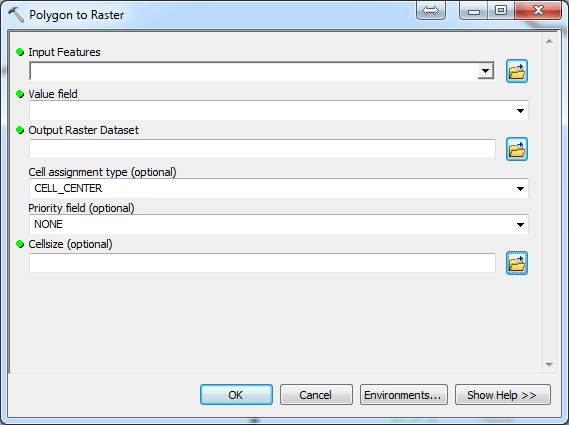
- Value Field: Use FID or any other field
- Output Raster: V:\<project Folder>\cruise2ch.img
- Cellsize: Convert your spacing to meters
- Convert your newly-created raster back to a point dataset
- ArcToolbox > Conversion Tools > From Raster > Raster To Point
- Input Raster: the raster layer you created in step 2
- Output Point Feature: v:\<project Folder>/cruise2ch.shp (this is a new point layer your cruise points)
Use the CruisePoint for ArcGIS 10 Add-in
An ArcGIS user can add functionality to ArcMap through the use of Add-ins. One I use often is called “CruisePoint for ArcGIS 10”. Download it from here (http://www.arcgis.com/home/item.html?id=cd762daa199a4845a26b292a9f8ac5b3) or Google it.
The Add-in must be installed and loaded into ArcMap
- Download the CruisePoint_v2.zip from the site above (hit the open button near the top left of the web page to access the download)
- Extract the Add-In and open the contents in Windows Explorer
- Double-click on the CruisePointTool_V2.esriAddIn file
- The ESRI ArcGIS Add-in Installation Utility appears

- Hit the Install Add-In button
- In ArcMap, Customize > Toolbars > (Commands Tab) >
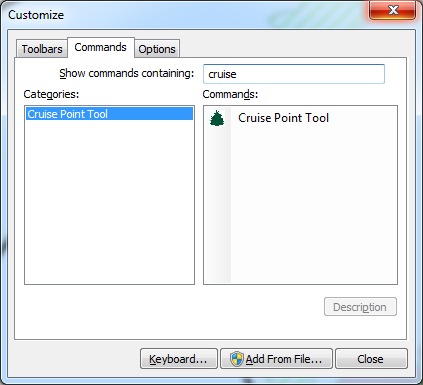
- Type cruise in the Show Commands Containing: window
- Grab the Cruise Point Tool in the right-hand window and drag it over to an existing toolbar
- The Add-In is now installed, but you are not ready to run it yet.
You must set up a file geodatabase and populate it before you can run the tool. I will demonstrate…