I have over three years of drone photos stored on my computer. Unfortunately, I have not kept track of when/where/why I have flown. I do, however, have only a handful of directories in which I have saved these photos. I need to search specific directories on my computer for JPEG or TIFF images and log each:
- photos path and name, the
- date each photo was acquired, and the
- X, Y, and Z stored in the photo’s header.
Ultimately, I would like to make a map of all the sites I have flown!
I will use the following tools for this task: ExifTool and Window’s command prompt, EXCEL, ArcMap (or QGis).
ExifTool is a command-line application for reading, writing and editing meta information stored in an image’s header. Download the Windows Executable from Phil Harvey’s site (https://www.sno.phy.queensu.ca/~phil/exiftool/).
- Extract the file you just downloaded to the working directory you create for this lab. I have one file called ‘exiftool(-k).exe‘ in my c:\temp\exiftool-10.93 directory. Of course, your path might vary from mine.
- Use Windows Explorer to navigate to your working directory and rename the file to ‘exiftool.exe’.
Command Prompt
- Open the Windows command line. Type cmd in the search window (select Command Prompt when it appears)
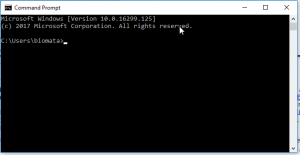
- In this screenshot, my current command prompt working directory is ‘c:\Users\biomata’
- Change your command prompt working directory to match the folder in which you extracted the ExifTool executable
- In my case, I type cd c:\temp\exiftool-10.93 and then hit enter. You need to change this entry to match your extraction location.
- If for some reason you extracted the ExifTool to somewhere other than the C:\ drive, you must first change the drive by typing the the drive letter followed by a colon
- Change to the E:\ drive by typing e:
- Change to the M:\ drive by typing m:
- If successful, the drive shown in the command prompt will change (in my case, from c:\Users\biomata to e: or m:
- Type dir for a listing of all files in that folder
- You should see ‘exiftool.exe’ listed. If you don’t, then you are not in the correct location.
ExifTool command
The command I submitted on my office computer to store the file name, date/time, GPS latitude, GPS longitude, and relative altitude of all files on my G:\ drive was this:
exiftool.exe -csv -r -FileName -DateTimeOriginal -GPSLatitude -GPSLongitude -xmp:RelativeAltitude G:/ > Images_GDrive.csv
The output from the above command is a CSV file called Images_GDrive.csv. This file is saved in the directory from which the command was issued. In your case for this lab, it will be saved in your ExifTool folder.
A little data cleaning in Excel
Open your CSV in Excel… Use my file HERE (this is the same download link from above)
Create and populate a FileExtension field
insert a new column after column Bin C1, type FileExtensioncopy the following into C2:=RIGHT(B2,LEN(B2)-FIND(".",B2))copy this formula down to all cells
Delete all non-image records
- sort the workbook by the GPSLongitude column
- manually delete records that do NOT have a GPSLongitude or GPSLatitude value
- You will have 7818 records remaining in the workbook
Convert the GPSLatitude to decimal degree format
- copy the GPSLatitude column over to column H
- rename column H to DDLatitude
- select the DDLatitude column
- Run Find/Replace (ctrl H) four times
- deg (type deg in the FIND WHAT box –> REPLACE WITH a single space (hit the space bar to insert one blank space) –> Replace All
- ‘ (this is a single quote) –> (hit the space bar to insert one blank space) –> Replace All
- ” (this is a quotation mark) –> (hit the space bar to insert one blank space) –> Replace All
- N –> (hit the space bar to insert one blank space) –> Replace All
- Your DDLatitude entries should now look like

- Convert DMS Latitude to DD Latitude
- Split column H by space
- select column H
- Data > Text To Columns > Delimited (Next) > tick the box next to Space > Finish
- Type the following in K2 and then copy it down to all of the rows
=(H2 +(I2 / 60) + (J2/3600))
- Copy the values from K2 and Paste Values into column H
- Delete columns I, J, and K
- Split column H by space
Convert the GPSLongitude to decimal degree format
- copy the GPSLongitude column over to column I
- rename column H to DDLongitude
- select the DDLongitude column
- Run Find/Replace (ctrl I) four times
- deg (type deg in the FIND WHAT box –> REPLACE WITH a single space (hit the space bar to insert one blank space) –> Replace All
- ‘ (this is a single quote) –> (hit the space bar to insert one blank space) –> Replace All
- ” (this is a quotation mark) –> (hit the space bar to insert one blank space) –> Replace All
- W –> (hit the space bar to insert one blank space) –> Replace All
- Your DDLongitude entries should now look like

- Convert DMS Longitude to DD Longitude
- Split column I by space
- select column I
- Data > Text To Columns > Delimited (Next) > tick the box next to Space > Finish
- Type the following in L2 and then copy it down to all of the rows
=(I2 + (J2/60) + (K2/3600)) * -1
- Copy the values from L2 and Paste Values into column I
- Delete columns J, K, and L
- Split column I by space
Save your workbook out as a new CSV file
ArcMap Magic
- Load the new CSV file you just saved into a blank ArcMap project
- Create an EVENT THEME (displays the lat/long values as a series of points)
- right-click on the CSV layer in the Table of Contents > Display XY Data
- X = Longitude
- Y = Latitude
- Coordinate System: Geographic > World > WGS 1984
- Hit OK and notice the new layer loaded in the TOC
- Save your Event Theme out as a new shapefile
- Right-click on the EVENT THEME > Data > Export Data
- Yes, load new layer to the view
- Submit one final query against the new shapefile to filter all of the empty records
- Open your shapefile’s attribute table > Table Options > Select by Attributes
"FileName" <> ''
- You should have 7817 records selected
- Open your shapefile’s attribute table > Table Options > Select by Attributes
- Save the selection out as a new shapefile
- Right-click on your shapefile > Data Export Data
- Drop a basemap in the background and you should have something like this
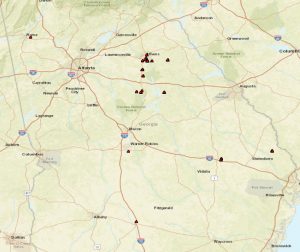
- You could finish this map out by creating a Map Layout
- insert north arrow, legend, scale bar, text, etc and then
- File > Export to save as a JPEG.
- My interest is to automatically group records by flight.